Transcript
Howdy and welcome back. Like most of episodes this one is going to move quickly. I do this so they don’t go on forever, however, I highly recommend stopping and rewatching parts that might go to fast. So, I thought it would be useful to go over how to deploy activityOverlord into the wild. This episode will cover deployment to heroku, a self-described cloud application platform.

Heroku makes it really easy to deploy node apps without a lot of the overhead typically associated with deploymnet. Although this episode will concentrate on heroku, I plan on covering other platforms in future episodes.
First, let’s look at the current stack of technologies used by activityOverlord.

I’m running OS X Mountain Lion locally on a MacBook Pro. I’ve got node installed and sails of course runs on top of that. Our models, currently the user model, uses a mongodb database also running locally on mountain lion. And finally, we store our sessions and sockets in memory.
To do this deployment the stack of technologies is going to change.
For example, instead of running locally on OS X Mountain Lion, node and sails will run on an instance of the hardware and software provided by heroku. Looking at the heroku docs, node.js runs on instances of Ubuntu 10.04.
Next, instead of our current local mongodb database, we’ll create a new instance of the database on a hosted solution provided by mongohq. Finally, we’ll move our in memory socket and session store to redis and specifically redis-to-go hosted by heroku as well.

Moving from local mongodb to hosted mongohq So you’ll first need to create an account on mongohq. Once you have an account and are logged in, create a new hosted mongodb instance using the sandbox option. Although this option isn’t for production it works for the purposes our project. Next, I created a user for the database that we’ll use to authenticate in our app.
So I want to incorporate this hosted database in my local instance of activityOverlord before we move it to heroku and we do that by changing the local.js file. First let’s do a bit of review.
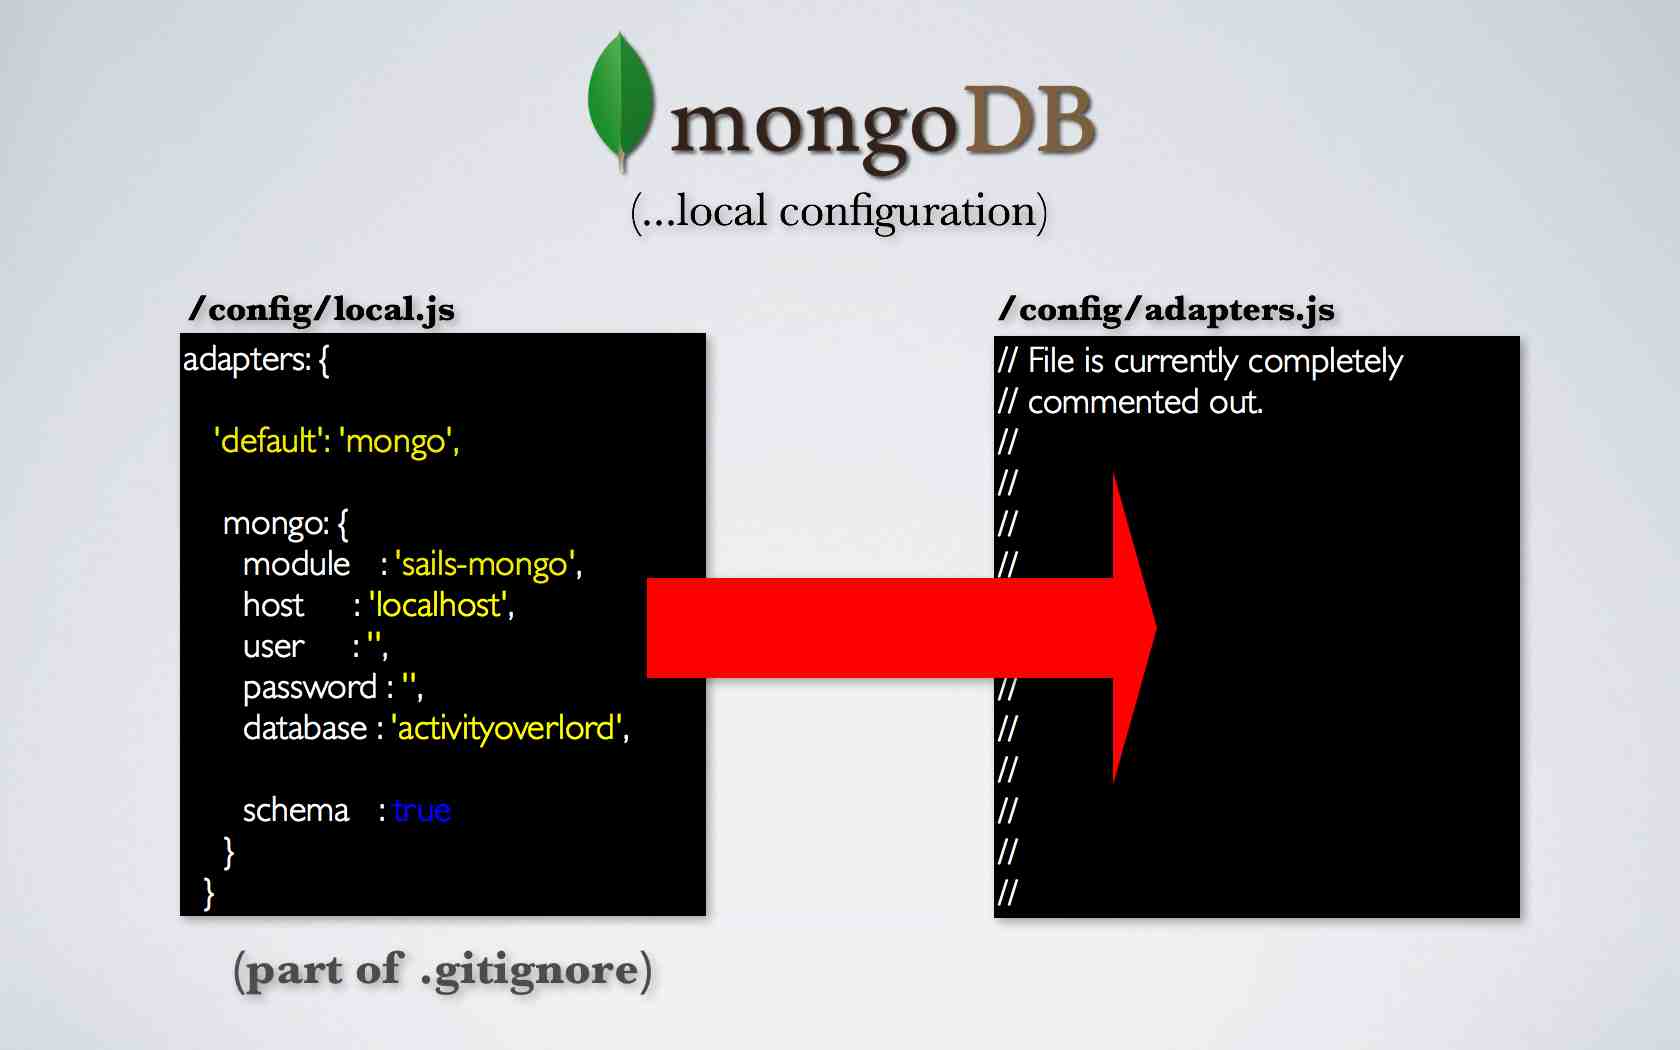
Our local configuration of mongoDB uses local.js within the config folder while adapters.js is completely commented out at the moment. The adapters.js file is one place sails looks to for connections to databases. The local.js file overrides anything contained in adapters.js. Also recall that local.js is part of .gitignore so the file will not be saved to git or our repo.
The impact of this is that anything sails relies upon in terms of configuration in local.js will not be part of the deployment unless we provide for it somewhere else in the code or by using environment variables prior to deployment.
Before we address the deployment issues lets first go into the code and make a few changes to local.js to use our new mongohq instance.
We no longer need the host, user, password, and database attributes because they are combined in a new attribute called url. I’ll copy and paste the url from the mongohq interface and then insert the username and password I created earlier for the database.
/config/local.js
1 2 3 4 5 6 7 8 9 10 | |
Let’s see if this worked. I’ll go into the terminal and lift activityoverlord. Next, I’ll create a new user and great it looks like things are working. So, I’ll go back into mongohq and into the user collection and there’s my new user. To start things off, I’ll change my admin attribute to true. Now, I’ll log-in to the account and…great I have my admin user set-up.
Okay, now, let’s deploy to heroku. If you don’t already have an account on heroku, go ahead and create one now. Next, you’ll want to install the heroku toolbelt which can be found here. Finally, you’ll want to login to heroku from the terminal. So let’s go to the terminal and type heroku login, this is going to ask us for our heroku credentials and the first time you run it, it’s also going to set-up your public SSH key. Don’t worry If you don’t already have one, heroku will walk you through setting one up.
So now that we have an account, got the toolbelt installed, and we’ve logged in from the terminal, we want to back to the heroku dashboard and select create a new app. If you want to enter in an app name it will need to be something other than activityoverlord as app names must be unique. If you don’t put in an app name, heroku will create one for you and regardless, you can always go back and rename your app later.
Now you’ll recall that we have a local.js file pointing to the mongodb database hosted on mongohq. Since local.js will not be part of our repo because of .gitignore we need some way of letting the heroku server instance know about the mongodb configuration and we do this with environment variables. So let’s go back into our adapters.js file and I’m going to copy and paste the mongodb configuration information from our local.js file into this adapters.js file. However, I’m going to replace where we have a string that contains the Username, password,path, and port of our mongodb instance on mongohq with an environment variable called DB_URL and that’s going to be prefaced by process.env.
/config/adapters.js
1 2 3 4 5 6 7 | |
So, process.env is a node object that contains our environment which also includes the environment variables that we’ll add to it. So to add the environment variable to our heroku instance, let’s go back to the terminal and we’ll type heroku config:set DB_URL= and to get our path I’ll look in our local.js and copy the path of our mongohq instance and paste it here, I’ll also add —app activitityoverlord1 to point specify which app to associate with.
So we’ve set DB_URL on the remote heroku instance using heroku config:set and used that environment variable in our adapters.js file to point to our mongoHQ instance.
So how is heroku going to start ativityoverlord? We do that by creating a Procfile in the root of our app. A Procfile is a mechanism for declaring what commands are run by our app’s dynos on the Heroku platform. More on dynos in a second. Let’s go back into the code and add a new file named Procfile with no extension. The file will have one line: web: node app.js
Next, make sure you have sails-mongo in your package.json file and that it’s installed in node_modules. In fact it’s probably best to do an npm install to make sure you have all of the depencies installed. Now we need to link up the heroku end point with our project. Let’s go back to the heroku dashboard and look under the settings tab. Go ahead and c opy the git url and then go back to the terminal and enter: git remote add heroku <and then paste the git url here> and press enter. Add all of your changes to git using: git add . and then commit them using git commit -am “my very descriptive change log”. Finally push the project by entering: git push heroku master.
The last step before we fire up our browser and look at activityOverlord is to set up a dyno for our app. Heroku suggests thinking of a dyno asa virtualized Unix container. In sum, it’s the place where our app will run. To assign one dyno to our app, type: heroku ps:scale web=1.
So let’s go back into the browser, refresh the app, and log-in. Everything looks to be working, however, open up the console and you’ll see an error. Socket.io is doing its job. Websockets isn’t working so its failing over to long polling so we still have a connection. As it turns out, heroku has just started to support web sockets and you must enable it on the application instance. To do that, we’ll go back to the console and type heroku labs:enable websockets. It can take a second before websockets starts working. There we go. Also, I have had issues with it periodically failing and going back to web polling, but it is in beta so we’ll see how it improves over the coming weeks.
Next, I want to take a look at moving our session and socket store to redis. But first, why would we want to do this in the first place? Let’s take the following example. I have three instances of heroku running activityOverlord on each instance. I use a load balancer to distribute the incoming requests across the three instances.

Suppose we store sessions in memory, and on the first request the load balancer sends us to instance A where we authenticate and the session cookie is set for that server instance. On the next request we’re sent to instance B, where we haven’t yet authenticated and therefore won’t be able to access the resources we would have had access on instance A. Therefore we need some way for the multiple instances of our application to share the same session store.

This is why we’re moving our session and socket store to redis.
So let’s set-up redis. We’ll head back to the heroku dashboard and our activityoverlord instance. Select add-ons and redis-to-go. Under Plans, select Nano, or the free plan. I had to put in a credit card despite picking the free option. Select add nano for free. Go back to you instance of activityoverlord and select redis-to-go nano under add-ons.
Here you’ll see the configuration path to our redis instance. First, let’s go into activityoverlord and our session.js file. As the documentation suggests, I’m going to uncomment, the adapter, host, port, db, and password keys. We can then go back to our redis-to-go configuration file and copy and paste each value into the keys in session.js.
/config/session.js
1 2 3 4 5 6 7 | |
Okay, let’s see if this worked. I’ll go back into the terminal and commit my changes and then push them to our heroku instance. Now let’s go back to the browser and try to log in. Even though that worked the true test, is whether our session id is in the redis database. To determine this, I’m going to use the redis-cli command line tool. To use this tool we need to again use the host, port and password to authenticate to the database. Once connected I’ll use the keys command passing in an * as an argument to get all keys. And there’s our session key, great. The redis website has good documentation on other useful commands.
You might be asking yourself, I don’t really want to put my redis database credentials in my github repo, and you know you would be right, that would be a very bad idea! So instead we can use environment variables to set these credentials to our heroku instance. Let’s go back into session.js and change the values for the host, port, db, and pass keys to environment variables.
/config/session.js
1 2 3 4 5 6 7 | |
Now the server instance will be looking for those environment variables for the values. We’ll set them on the heroku instance the same way we did for DB_URL using heroku config:set.
Okay, now let’s do the same for sockets. We’ll go back to sockets.js. Similar to session.js we’ll uncomment the host, port, db, and pass keys and then insert the environment variables for the values.
/config/sockets.js
1 2 3 4 5 6 | |
Now, I’m going to go back to the terminal and commit my changes again and push them to our heroku instance. Now I’ll go back to the browser, notice that I don’t have to login as my session is now maintained by redis whereas before we were doing things in memory which required us to login each time the server was lifted. I’ll manually log out and log back in. And great it looks like everything is working.
Okay, the last thing I want to address with deployment is changing the value of the NODE_ENV variable from development to production. For sails one of the biggest outwardly facing changes as a result of using production instead of development is that all of our css files will be combined and minified into one file. Javascript files will also be combined and minified as well. In addition many modules utilize NODE_ENV as a hook to determine whether to make changes based upon its value. We’re going to actually set the environment variable in our Procfile. So let’s go over to the Procfile and add web: NODE_ENV=production node app.js. I’ll commit my changes and push them to heroku. Back in the browser I’ll refresh the page and then look at the source to confirm that all of my css is minified in one file and all of my javascript is minified in one file.
So now that we’ve successfully deployed activityOverlord to Heroku I want to address the work-flow for moving forward with development. The repo for activityOverlord will have the following set-up for local.js, adapter.js, session.js, and sockets.js. The local.js file will default to our local instance of mongodb.
/config/local.js
1 2 3 4 5 6 7 8 9 10 11 12 13 14 15 16 17 18 19 20 21 22 23 24 25 26 27 28 29 30 31 32 33 34 35 36 37 38 39 40 41 42 43 44 45 46 47 48 49 | |
If you want the local version of activityOverlord to use hosted mongohq instance, just uncomment and comment the following lines. Since local.js will overwrite adapters.js we can leave the existing code in it.
/config/adapters.js
1 2 3 4 5 6 7 8 9 10 | |
Session.js will use the in memory session store, but when you want to deploy just uncomment these lines and comment your in memory config.
/config/session.js
1 2 3 4 5 6 7 8 9 10 11 12 13 14 15 16 17 18 19 20 21 22 23 24 25 26 27 28 29 30 31 32 33 34 35 36 37 38 39 40 41 42 43 44 | |
The same holds true for the Sockets.js configuration file.
/config/sockets.js
1 2 3 4 5 6 7 8 9 10 11 12 13 14 15 16 17 18 19 20 21 22 23 24 25 26 27 28 29 30 31 32 33 34 35 36 37 38 39 40 41 42 43 44 45 46 47 48 49 50 51 52 53 54 55 56 57 58 59 60 61 62 63 64 65 66 67 68 69 70 71 72 73 74 75 76 77 78 79 80 81 82 83 84 85 86 87 88 89 90 91 92 93 94 95 96 97 98 99 100 101 102 103 104 105 106 107 108 109 110 111 112 113 114 115 116 117 118 119 120 121 122 123 124 125 126 127 128 129 130 131 132 133 134 135 136 137 138 139 140 141 142 143 144 145 146 147 148 149 150 151 152 153 154 155 156 157 158 159 160 161 162 163 164 165 166 167 168 169 170 171 172 173 174 175 176 177 178 179 180 181 182 183 184 185 186 187 188 189 190 191 192 193 194 | |
We’ve covered a bunch of material in this episode. I hope you found it helpful and as always thanks for watching.